How To Clip Dogs Nails

The majority of Dogs do not enjoy having their nails trimmed, the extent of which, will depend upon the personality of the dog and its past experience with the process of having its nails cut. Dogs tend to show their displeasure with this in a variety of ways such as trying pull or jerk the foot away as you hold it for clipping, biting, and/or throwing a complete fit; requiring that they be restrained for their safety and the safety of the individual(s) trimming the nails.
If you have a dog that is not fond of the process it is advisable that you utilize a muzzle for your protection and to limit the amount of stress on the dog.
 Methods for Trimming Dog Nails
Without Restraining
If you are one of the fortunate individuals that has a dog that does not particularly mind the process then trimming the nails will be a breeze. Get your tools (mentioned below) and some treats, you can trim the dogs nails either standing or laying down. Laying down would be preferable as there is less chance of the dog twisting, or moving which could cause you to mis-cut and harm your dog. Simply grasp a foot securely with one hand, using your fingers to seperate the toes so you have good access to each individual nail. With the other hand begin the process of clipping, while using a calm, soothing voice, being mindful of the dogs body language to alert you if you cut to short or if they are becoming agitated with the process.
Restraining a Dog
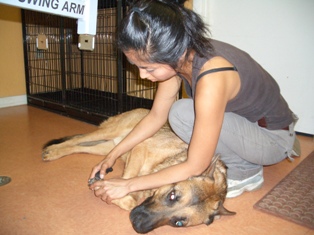
The easiest and least combative way to restrain a dog for nail trimming is to place the dog on its side, feet pointing away from you, this places you behind the dog. Depending upon which side of your body the dogs head is nearest would determine which arm you utilize for grasping the front leg of the dog. The method below is when the dogs head is nearest the left shoulder, if the dog is facing toward your right shoulder simply reverse the method below using your other arm.
| |
At this point you can snake your left arm forward to grasp the front left foot of the dog, ensuring that your arm stays in close contact with the dogs body between the base of the skull and the dogs shoulder. This should place your left forearm across the neck of the dog, while holding the left front foot of the dog, pull it out to a straightened position holding it securely in place. This essentially negates the dogs 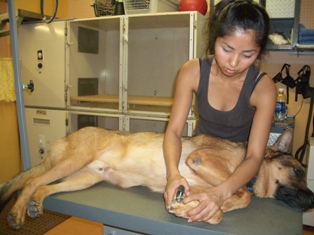
By controlling the neck with your left forearm you are able to keep the dogs head down, which helps to prevent them from rising up, and makes it much more difficult for them to turn their head into a position where they could bite you. Controlling the front underside foot and leg it makes it nearly impossible for the dog to rise. The reason that you pull it out into a straightened position is to straighten out the shoulder and ensure that the dog is completely on its side. If you do not pull the leg out straight the dog may have the ability to roll quickly retracting this leg under its body while using it to rise up, or struggle, potentially injuring you and or the dog.
Lastly by placing your body weight on the on the upper back and shoulders of the dog it limits their ability to roll towards their feet and stand, it also gives you much more control and maneuverability over the body of the dog as you trim the nails. The other benefit of placing your body weight on the dog is that is plays a psychological factor in that it makes them feel controlled and thus less likely to struggle.
"Not A Happy Camper" |
As you look at the video on the right you will notice how the dog is secured with the left forearm across the neck region. Even though this dog is not particularly fond of the getting his nails clipped, at the end he is no worse for wear. Another key to completing a nail trim successfully is not to get excited. If the dog is scared or aggressive just remain calm, secure the dog and continue with the process. Do not add extra tension or emotion by becoming angry, or frustrated with the dog as they will react to your anger or frustration by struggling or fighting more. This will make it more difficult for you and for the dog, and create a negative association for the dog and further reinforce their dislike for the procedure.
 Tools you will need to clip nails
Before beginning your nail clipping adventure ensure that you have a good set of nail trimmers, the type depends upon your dog and your personal preference, styptic powder (to stop bleeding), and a muzzle if necessary
Styptic Powder (aka Quick Stop)
 A very simple item and a must have if you intend on cutting your dogs toenails, it's not expensive and one container will provide enough product to last you through a lifetime of nail trimming with your dog. There are various variations and forms of the product, some with applicators, some as a plain powder but the application is the same in each instance. Take either the applicator or a pinch of the powdered and hold it directly to the end of the affected nail and press it in, and count to 3.. Presto the bleeding has stopped and you are ready to continue.
Dog Toe Nail Trimmers
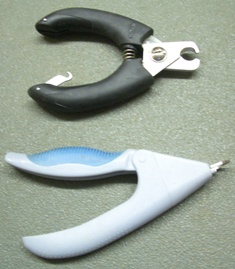
There are 2 main styles of nail trimmers on the market today, the Guillotine variety which is fairly standard and of which there are not a lot of variations and the Scissor type of which there are two main variations, a Curved blade type and Straight blade type. There are advantages and disadvantages to each and I will explain them here.
The Guillotine Type Trimmer
The main advantage to the guillotine style nail trimmers is that they are easy to use, and you can secure the nail in the clippers by applying moderate pressure prior to cutting which works well for dogs that tend to struggle. Guillotine Dog Nail trimmers are good for small dogs up through medium large dogs. The main disadvantage to this style of dog nail trimmer is that it does not work exceptionally well on large dogs with tough thick toenails, I have during one attempt to use these on a large lab bent the handles together without the blade cutting through the nail.
| |
There is also the issue of nails that are in bad shape and have curved around like a rams horn, at this point it becomes extremely difficult to get the nail trimmer to slide over the nail and cut properly. In the event that you are able to slide the nail trimmers over and around the nail to the proper position, you will be forced to cut from the top of the nail down toward the quick, this tends to apply a lot of pressure on the nail prior to the cut as you will be cutting through the toughest portion of the nail first. Lastly there is the issue of quality, the majority of guillotine style nail trimmers are made of low quality materials that tend to wear out quickly, or bend to the point of becoming unserviceable after a few battles with tough toenails. For beginners with small or medium large dogs (up to a Golden Retriever), with nails that just need maintenance trimming I would recommend you start building your confidence with a set of these.
The Scissor Type Trimmer
The best all around choice for those that have some experience in trimming dog toenails. One of the major benefits is in its longevity and strength, the majority of scissor type dog nail trimmers are made of a higher quality steel allowing them to easily cut through even the thickest, toughest most un-maintained nails. . I have one set that has been used daily for the past 2 years and still cuts with ease, mind you that we run a professional grooming salon in addition to our other services. I would estimate that roughly 81,000+ individual nails have been trimmed with this one set alone.
That may sound like an unbelievable number buts lets do the math, At an average of 8 dogs per day with 18 toenails each (I am assuming 8 toenails, and 2 dewclaws on the front and 8 toenails on the back) Over the course of 2 years.
8 + 2 + 8 = 18 (total nails per dog) x 8 dogs per day = 144 (total nails per day)
Multiply 144 (nails) x 288(working days in a year excluding Sundays and Holidays) =41472 (Nails per Year)
41472 x 2(years) = 82944 Nails (Wow)
So as you can see these will more than meet the needs of the individual user over a lifetime of use.
The one major disadvantage to the curved blade scissor type is that it is difficult to cut the nails of smaller dogs and puppy’s, as well as nails that have curved around ram horn style. This is due mainly to the fact that each side of the clipper is roughly 1/8 inch thick making it difficult to slide back far enough to make an effective cut on small dogs with small toenails and in order to cut nails that have curled around you need to position the clippers so that the top of the nail trimmer is parallel to the toe a difficult task especially on smaller dogs. The last problem with this style is that the curvature on the blades prevents them from opening wide enough to simply slide over the nail on large dogs, you find that you have to thread the nail through the clippers as your would with the Guillotine style prior to making your cut.
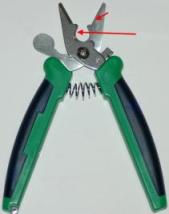 This variation of the scissor type is an effective accessory to compliment both the guillotine type as well as the scissor type curved blade. It has all of the same advantages as the curved type, with the added bonus of being able to easily handle small nails, and nails that have curved badly. With the straight blades you simply slide the clippers over the nail at the position that you would like to cut, this allows you the ability to cut from any angle, unlike the Curved and Guillotine type where you must first slide the nail through the center of the clippers and then work the nail into the position that you would like to cut. Recommended again for users that have some experience in cutting nails.
![]() Dog Toe Nail Anatomy
Dog Toe Nail Anatomy
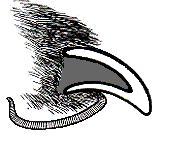
Before taking your new found knowledge of dog nail clippers and going to work you first need to understand how dog toenails are actually put together in order to do this properly. Unlike human nails which are essentially flat layers of keratin with a hidden blood supply, dog nails are living appendages with a blood supply and sensitive nerve endings that run directly down the center of the nail called a “quick”.
The outer portion of the nail is hard and has no feeling because it has no nerve endings, while the core of the nail “the quick” is comprised of small blood vessels and sensitive nerve endings, should you in a zealous quest to cut your dogs nails hit the quick, it will not only be extremely uncomfortable for the dog and create a negative association with the process, it will bleed. Ideally in a perfect world all dogs would have transparent nails allowing you to easily distinguish exactly where the quick ends, however in reality many dogs have nails that are completely black which totally obfuscates the location of the quick within the nail.
Dog Toe nail color is generally determined by the color of the surrounding hair and skin, dogs with dark hair around the nails will generally have dark or entirely black nails, while dogs with white or light colored hair around the nails will be the opposite having nails that are more translucent.
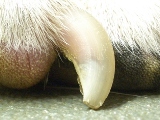
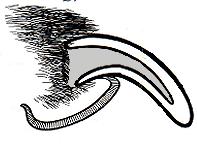
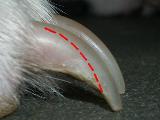
The average Dog Toenail in need of trimming. The quick is represented as the grey shaded area in the drawing and is the pink area in the actual nail picture.
This nail is excessively long, to the point that the nail tip touches the ground as the dog walks pushing the toes up and altering the way that the pads touch the ground. This can lead to a number of long term problems including permanent twisting of the toes, as well as hip, elbow and shoulder problems. The important thing to note about the pictures to the right is that the quick will grow out with the nail. When toenails reach this state you will need to be careful to avoid hitting the quick and causing the nail to bleed. To remedy this problem you will need to cut the nails carefully 2mm away from the quick every few days, as the dog walks and wears on the newly shortened nail the Quick will recede, and you cut again. This process is repeated until the nails are at a manageable length. Note the red area outlines the path of the quick in the photograph
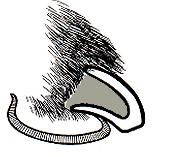
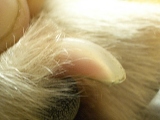
A properly trimmed and maintained dog toenail. Notice that the quick has receded to a point that the nail can be cut to a healthy and manageable length. The nail pictured here is roughly 1/2 inch long and attached to a 65lb Golden Retriever Mix. This goes to show that with proper maintenance trimming even the nails of large dogs can be kept relatively short.
 Cutting Dog Toe Nails
Now that we have covered the basics and you are comfortable with both the tools that you will be using as well as the anatomy of dog toenails lets move on to cutting some nails. Remember that if you hit the quick as a first timer it is not an emergency, it's unpleasant for the dog and a mess as the quick inside the toenail will bleed a lot, but it's not a panic situation. I have trimmed thousands upon thousands of dog toe nails in my time and sometimes it just happens, use some styptic powder (aka quick stop) applied directly to the end of the affected nail and move on. Always try to cut the nails to the ideal length which is 2mm away from the quick, do not arbitrarily choose the length that you want the nail and cut away. Remember that in long toe nails the quick has more than likely grown out with the nail, so always use the quick as your reference for determining the depth of your cut.
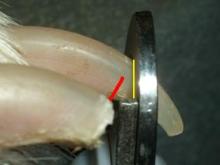
With Guillotine style Nail Trimmers the nail is passed through the clippers so that the clippers will cut up from the bottom of the nail and away from the quick. Once the clippers are positioned properly give on quick hard squeeze to cut completely through the nail.
A properly placed set of Guillotine Style Toe Nail Trimmers. The Red line represents the stopping point of the quick, and the yellow line is the line of cut. The Nail in front of this one has already been trimmed.
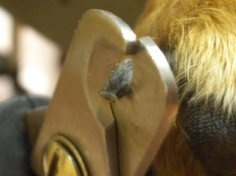
With Scissor style Nail Trimmers the nail is either inserted through the top (smaller nails) or passed through the center, the trimmer is then placed so that the cutting surface is at a right angle to the bottom and top of the nail so the blades will cut the nail from bottom to top, not from side to side. Once in position give the trimmers one hard firm squeeze to cut completely through the nail in one smooth motion.
A properly placed set of Scissor Type Nail Trimmers. Notice the position of the cutting surfaces, this ensures a proper cut. Dog toe nails should never be cut in a fashion that the nails are pinched in and cut from the sides.
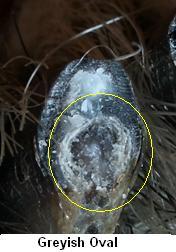
For black toenails cut a little at a time until you see a grey colored circle or oval starting to appear, this is the indication that you are close to the quick and should stop.
The perfect cut stops here, there is no need to go any further as it will just cause undue stress and pain for the dog, resulting in a more difficult experience for the both of you next time around.
The following two pictures demonstrate the actual quick starting to appear. This is the point where you should most definitely stop as you may have already gone a bit too far. It is possible that your dog may have some increased sensitivity to walking as the quick is now exposed and protruding past the end of the nail. This will wear down over the course of the following few days, eventually receding back into the nail. Additionally don’t be surprised if the tip of the quick gets cut or torn off as the dog walks causing it to bleed a little bit. This is typically not serious, perhaps a bit messy or annoying for you and a bit sensitive and uncomfortable for the dog, but not serious. There is no need to get over zealous and try to push it by trimming a little more. If your new or even if your experienced, mistakes can happen, if you make an honest mistake and trim a little to close don't worry, you still have at least 9 more chances to get it right. At this point the dog may feel some discomfort, but you have avoided actually trimming off the end of the quick causing major discomfort and bleeding.
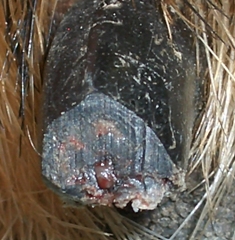
Again you can see the end of the quick as the small pink fleshy portion in the center of the nail
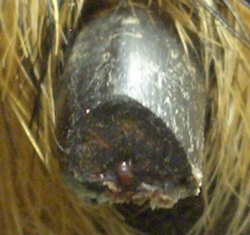
The next two pictures depict a dog toe nail in which the nail was cut to short and actually cut into the quick causing it to bleed and unnecessary discomfort for the dog.
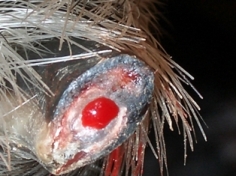
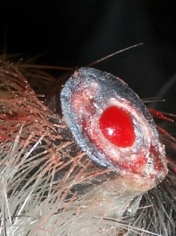
Always be careful and take your time, there is not rush when it comes to cutting your dogs nails. The key is to do it correctly and ensure that your dogs feet and nails are well taken care of to prevent injuries or aggravations that can be caused by excessively long or un-maintained nails.
Comments
Thanks, what a fantastic article!
One quibble: you wrote "Dog toe nails should never be cut in a fashion that the nails are pinched in and cut from the sides." Yet this is exactly what the picture next to the text shows. I assume the photo is correct and that I've been cutting my poor dog's claws wrong all these years.
The pictures of the cut nail are very confusing. The picture and illustration denoted as "A properly trimmed and maintained dog toenail" show the angle with the top part of the nail being longer than the bottom, which would cause most of the nail to touch the ground when extended.
However, the picture illustrating proper trimming, with the yellow and red lines, shows the opposite angle--top part of the nail being shorter than the bottom. This would result in only the bottom of the nail touching the ground when extended.
Which is correct, and why is the picture with the yellow line exactly the opposite angle of what is presented as a properly trimmed nail?
The pictures of the cut nail are very confusing. The picture and illustration denoted as "A properly trimmed and maintained dog toenail" show the angle with the top part of the nail being longer than the bottom, which would cause most of the nail to touch the ground when extended.
Maybe this will help you out. In response to your question about the first image, in the aside to that image it states:
"A properly trimmed and maintained dog toenail. Notice that the quick has receded to a point that the nail can be cut to a healthy and manageable length. The nail pictured here is roughly 1/2 inch long and attached to a 65lb Golden Retriever Mix."
This is past tense, which implies that the nail has been cut previously and maintained. As a result it currently appears as so. I am sure you’re still confused, so let me explain it like this. There is a proper way to trim dog toenails, and there is a correct angle to use when cutting the nails. That being said, however, you have to understand that regardless of how the nail is initially trimmed, as the dog walks around and the nails are abraded by the ground, they will eventually take the shape pictured if they are cut short enough to begin with. If the nails are not cut short enough initially, the quick will continue to grow along with the nail until both curl around like a rams horn at the end of the toe.
However, the picture illustrating proper trimming, with the yellow and red lines, shows the opposite angle--top part of the nail being shorter than the bottom. This would result in only the bottom of the nail touching the ground when extended.
This is the correct angle as doing it the other way (top longer than bottom) would greatly increase the chances of cutting through the quick each and every time. The nails naturally curve and the quick is typically present towards the lower 1/3 of the nail. As a result, we angle against the curve and over the quick which allows us to cut more nail back, but without cutting into the quick.
Which is correct, and why is the picture with the yellow line exactly the opposite angle of what is presented as a properly trimmed nail?
Both, the first image is past tense and pictures the nail after it has been properly cut and worn down by walking. The second image shows the proper angle to use when cutting the nails so as to avoid the quick and remove the most material. This will allow the dog to wear on the nail as it walks, at which point it will appear similar to image one. I hope that clears it up for you, don’t' over think it.
Thank you for this. I am really worried about hurting my dog as she's now 15 and the vet cut into the quick last time which really distressed my dog. The vet did it on ever single nail too! So now her nails are very long as she doesn't manage to walk far now. I think I'll try a tiny bit at a time after reading this. Thank you so much for your fantastic information. Much better than our vet!
I'm glad you found it useful. I have clipped a couple hundred thousand dog nails in my time. So I did my best to base the article on experience.
This is the best article i have seen providing tons of information. The pictures are great as well. Thanks Richard!
No problem, glad you enjoyed it..
After much searching I came upon this website which is a wealth of USABLE, easy to understand information, and has made my Goldens first nail trimming experience a good one for both of us.
Thank you for this article. I especially liked the bit about there being a grey oval in black nails that is a precursor to the quick. I will use that as my guide for the future. Again, thanks for the info!
Mike
I tried to be as detailed as possible when writing the article. I wanted it to be simple and straight to the point and provide as many pictures as possible to help folks out. --Richard,


